
After installing and activating the plugin the first thing you need to do is go to the settings page located under the Honeypot Toolkit item in the wordpress admin menu. Below are screenshots of the settings page and descriptions of what is on each tab.

General Settings Tab
The first tab is titled General Settings and contains various settings for the plugin.
Use Project Honeypot
By checking the Use Project Honeypot checkbox a DNS query will be done at page load time to check the visitors IP to see if it is on the Project Honeypot Http:BL. You must enter your API Key on the Project Honeypot tab before this will work.
Use Spamcop
There is only one option to set for Spamcop. If you want to use the Spamcop block list to block visitors you just need to check the checkbox. This will do a DNS query at page load time to check the visitors IP to see if it is on the Spamcop block list.
Check Interval
This is the interval in days that all IP addresses blocked by Project Honeypot and Spamcop will be checked to see if they are still on their block lists. This check will do a DNS query for every IP in your database that was blocked because of a response from Project Honeypot or Spamcop. Be careful setting this to a low number if you have a large number of IP addresses on your block list.
Site Level Lists
This option is only available in a multi-site install. Allow admins to manage the IP lists on each site and not just the network admin.
Only Allow Whitelist
With this enabled no one can access the site unless they are on the whitelist.
Monitor Login
With this enabled login errors will be counted. If a visitor generates enough login errors to reach the limit or the username they enter is on the banned usernames list they will be blocked for a period of time. The settings to control the limit, blocked time, banned usernames, and time span are located on the Login tab. Users on the whitelist are not monitored.
Hide Usernames
When this is enabled the URL for all author archives will be changed to have an md5 hash instead of the username. The username presented on an article will also be changed to obfuscate it. This prevents scanning of usernames by appending ?author=## to the end of your sites URL. If a visitor attempts to log into your site with the md5 hash they will automatically be blocked if you have the Monitor Login option selected.
Monitor 404
With this enabled 404 errors will be counted. If a visitor generates enough 404 errors to reach the limit they will be blocked for a period of time. The settings to control the limit, blocked time, and time span are located on the 404 tab. Users on the whitelist are not monitored.
Response Code
The http response code that is returned when a user is blocked.
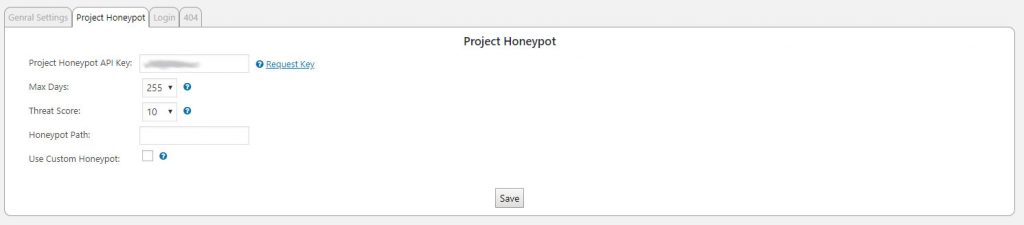
Project Honeypot Tab
The second tab is where you set the options for your Project Honeypot account. You will need to go to https://www.projecthoneypot.org/ to sign up for an account. Then you need to go to https://www.projecthoneypot.org/manage_honey_pots.php and follow the instructions to set up your honeypot.
Project Honeypot API Key
If you want to use the Http:BL from Project Honeypot to block visitors who have been identified as spammers then you will need to get an access key at https://www.projecthoneypot.org/httpbl_configure.php. After you get the access key you enter it in this input field.
Max Days
This is the maximum number of days since the last activity was seen from the visitors IP. If the IP hasn’t been seen by Project Honeypot for 20 days and you have the max days set to 19 or lower then the IP will not be blocked.
Threat Score
Project Honeypot returns a threat score when an IP is checked against their Http:BL. This is the maximum threat score that will be blocked. If the IP has a threat score of 20 and you have set the threat score to 20 or below then the IP will be blocked.
Honeypot Path
This is where you set the path to your honeypot script that you have set up through the Project Honeypot site. This can either be a full or relative path. A hidden link will automatically be inserted in your pages using this path.
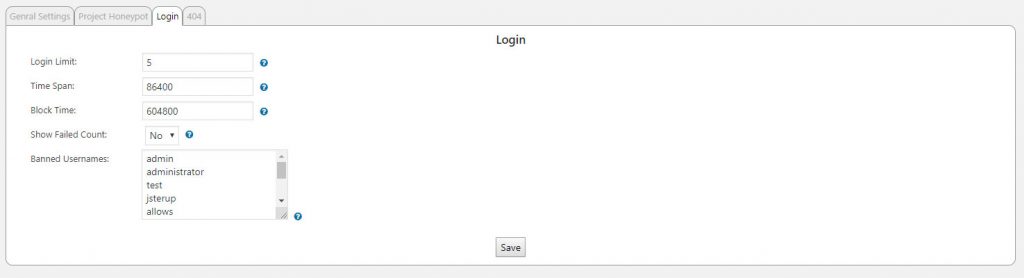
Login Tab
The third tab is to set up the options for monitoring user logins.
Login Limit
The number of failed login attempts before a user is blocked.
Time Span
The number of seconds that failed logins will be tracked. If a user hits the limit of failed logins within this number of seconds they will be blocked.
Block Time
The number of seconds that a user will be blocked if they reach the login limit or enter a banned username.
Show Failed Count
Setting this to yes will show a visitor the number of times they have failed to log in and how many tries they have before being blocked.
Banned Usernames
If a visitor tries to log in with a username on this list they will automatically be blocked. Bots will typically try usernames like admin or test to see if they can get logged in. By banning these usernames any bot that tries those users will automatically be blocked.

404 Tab
The fourth tab is where you set the settings for monitoring 404 errors.
404 Limit
The number of 404 errors a visitor can generate before they are blocked. Visitors on the whitelist are not monitored.
Time Span
The number of seconds that 404 errors will be tracked. If a user hits the limit of 404 errors within this number of seconds they will be blocked.
Block Time
The number of seconds that a user will be blocked if they reach the 404 error limit.